Gathering Your Files
 Be certain you have sent all the files needed to run your job. There are a number of
automated methods to gather your files. However, don’t skip using our checklist on the work
order to be sure the automated methods do not miss something we need. Use these functions
to save to a new folder so that no unnecessary files end up in the final folder. Be certain you have sent all the files needed to run your job. There are a number of
automated methods to gather your files. However, don’t skip using our checklist on the work
order to be sure the automated methods do not miss something we need. Use these functions
to save to a new folder so that no unnecessary files end up in the final folder.
1. QuarkXPress has "Collect For Output" that will collect all the files and prepare a
report.
2. PageMaker has an option in the save command that will copy "Files for Remote
Printing". To generate a report showing font listings, PageMaker has an Addition
(v.5.x) or a Plug-In (v6.x) that will display "Pub Info".
These functions do not collect fonts. Use the reports to help gather the necessary fonts.
Be careful with nested graphics. If you have a PhotoShop file placed in Illustrator then
saved as an EPS file and placed in a layout program, the fonts used in Illustrator will not be
included, nor listed in the layout programs report. The PhotoShop graphic will only be
included if the option "include placed graphics" is checked when saved.
Organizing Your Files
We suggest the following organization for
your folders or directories. If you follow these
conventions it will help speed the processing of
your order by making it easier for us to locate
your files, reducing confusion. Please include all
necessary files but do not send any extra files
such as fonts or graphics that are not part of the current job.
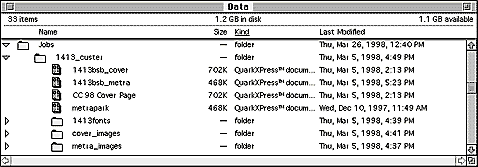
In other words, label a folder with your job number or company name. Make a "fonts" folder inside this folder and put all the fonts used in your documents inside. Likewise, make an "images" folder and copy all of your placed images into it. Place the layout document (Quark or PageMaker file) in the root of the the job folder.
If you are sending us your files on disk (zip, syquest, jazz, etc.) you're done. Copy them over and send them our way. If you're sending them over the internet via ftp or email there are a couple more steps.
It is well worth your time to compress your files into an archive file format such as .sit (stuffit) or .zip (pkzip, winzip). This will usually yield at least a 50% decrease in file size and a subsequent 50% decrease in your time to upload the file to us over the network. Depending on the type of files it can be as high as 80%. You get the idea; it's worth the extra few minutes of effort to do it.
If you are working with PC files that's it. Attach the file to an email if the total size is under one megabyte and send it off to our prepress department. Or log into our ftp server using your favorite ftp client or web browser and upload the file(s).
If you are sending Macintosh files there is another consideration though. Your Mac files have two parts to them: a resource fork and a data fork. The data fork is the actual data file, the resource fork is a little packet of information that tells the Mac OS all about what to do with the file and also it has the files icon in it. Without the resource fork you get those generic gray icons and your Mac won't know how to open the file. So, the way to make sure that both parts of the file will successfully travel over the internet (which is decidedly un-Mac friendly as far as file formats go) is to do what is called binhex encoding to the file before sending it. Many popular ftp and mail clients for Mac let you do this right in the program and when given this option always choose "binhex". If you want to use your web browser it's a little more tricky; you will have to binhex the file using Stuffit Deluxe or some other program which can perform the encoding before uploading the file via ftp using Netscape.
Hard Copy
The importance of submitting a final proof or printed sample cannot be overstressed. If we
have no proof to match, we will have to print the job on the assumption that it has rendered
identically on our system and yours. If this is not the case, we cannot be held responsible. If
you do provide a proof, we will check our pre-press proof against it thoroughly for any
differences. Please be sure to print the proof at 100%.
Fonts
The single biggest reason why files do not produce expected results is: FONTS!!! According
to some national estimates, bad or missing fonts account for 82% of all delays and additional
charges. To print your job properly, you must send us the fonts you used in your layout.
We do have a large font library but we may not have the exact one you used in your job.
Since there are many versions of the same fonts sold by different vendors, your font may not
match our font of the same name.
Cheap Fonts
Bargain fonts are worth what you pay for them. 5,000 fonts for $29.95, do not use
them! Often they do not perform on an imagesetter the same as they do on a laser printer. If
there is a font you must use, set the type in an illustration program (like Illustrator) and
convert to paths. This way, you control leading & kerning exactly and they will reproduce the
same on our imagesetter.
PostScript vs. TrueType
There are two types of fonts: PostScript and TrueType. PostScript fonts are highly
recommended. They are more reliable, cleaner and process more quickly. In certain trapping
situations, TrueType fonts will not work at all. Be sure to provide all files needed for every
font you use, both in your layout program and in any embedded illustrations (EPS files). One
screen "Suitcase" may require many Printer Fonts.
Stylized Fonts: No. Period.
Some programs allow you to apply styles (italic, bold, bold-italic) to a plain font to
approximate the real font variant. Do not use this option! A stylized font will in many
instances be replaced by the plain variant when RIPed. Express Color will not be held
responsible if this happens.
Use the font variant that is the style you want, not the plain variant with an applied style.
For instance, use the HelveticaBold font instead of the HelveticaBook font styled Bold.
Missing Fonts
Take close look at your files to find out what fonts you need to send. Remember that
enclosed EPS files also need fonts to properly render. Jobs with missing fonts will be delayed
until you are contacted and either approve a substitution or can send the fonts to us. If
substitution causes text reflow, we will not be held responsible.
Remember, PostScript fonts have two files, a screen font and a printer font. Both are
required.
Trapping
Do not trap your job. We have sophisticated trapping software to properly trap all jobs,
free of charge. If you have special reasons to apply your own traps, please contact us first.
Process vs. Spot Color
You must specify all colors to print with the proper inks. If your print job calls for black ink
and a PMS, that PMS color cannot be electronically defined as using process inks. The same
applies to process jobs, the colors cannot be defined as spot inks.
Most applications allow both spot and process color definition. Do not confuse type of ink
with model. A color can be defined using the Pantone Matching System as the model and the
type as Process. This produces a 4 color process simulation of the PMS Spot color selected.
To be sure you have defined all colors properly, print separations on your laser printer and
check that all the color elements are on the right plate and that they are screened properly. If
a color is intended to be a 100% fill of a PMS spot color and it prints out screened on the
Cyan, Magenta, Yellow or Black plate, then the color definition in the originating program is
wrong. The model may have been set to PMS however the Type was set to Process
(PageMaker) or the Process Separation (Quark) was turned on.
Scans
4 Color & Grayscale
Image resolution is usually expressed in terms of Dots Per Inch (DPI). The DPI of a given
image is one of the key factors in determining the final output size of the image and how
well the image will reproduce.
There is some debate and confusion about how many dots per inch you need for good
reproduction. Just because your scanner will go to 1,200 or more DPI does not mean that
setting will give you a better print, only that you can scale it more. When color or black &
white scans are imaged, they are turned into screens. Screens are measured in Lines Per Inch
(LPI) and vary according to paper, press and type of image. The debate centers over how
many DPI you need for a given LPI. The majority of "Experts" recommends your DPI be
between 1.5 and 2 times desired line screen. Express Color uses 400 DPI for all our scans.
This resolution produces superior results for screens up to 200 LPI.
The DPI also affects the size of an image in terms of megabytes (Mb) and thus how the
image will be stored, transported and output. An 8" x 10" image in CMYK at 300 DPI is
approximately 27.5 Mb, at 600 DPI the file is 110 Mb. The same applies to size. If you only
need the final size to be 4" x 5", at 300 DPI the file size will only be 6.9 Mb. Therefore,
you should scan to produce the final size needed, at the proper resolution.
Submit all color files in CMYK color. When converting a file from RGB to CMYK, you may
notice a slight change in the image color. If you must submit a file in RGB mode, we will
convert it to CMYK for you, but you should be aware that some colors may shift in hue or
desaturate. Also, converting a large file (10+ Mb) from RGB to CMYK may incur an additional
cost due to the additional prepress time required.
Bad Scans
Providing scans lower than 300 DPI or using GIF or JPEG compression will show noticeable
image deterioration. Excessively high resolution images are significantly larger without
improving the quality of the printed image, and may incur additional charges for RIP time.
Line-Art (Bitmapped)
Line-art scans should be done at a higher resolution and at an even divisor of 2540, such
as 635 DPI. They need this higher resolution to reproduce well and to define clean edges.
Line-art should be scanned at the highest optical resolution your scanner is capable of, not the
interpolated resolution.
Any questions you have will be cheerfully answered by our prepress staff at 1-800-930-6040, or email us at: printing@express-color.com.
|